Software Photoshop provides users with a lot of photo editing features. To mask the face on an image with Photoshop, you can combine many tools in the software to mask, blur or even completely remove the subject from the image effectively but still look very natural.
How to cover a face on a photo with Photoshop
However, the trick to delete or remove redundant objects in the image with Photoshop will be introduced in detail by Taimienphi in another article. Now, let’s learn about 2 simple but effective tricks cover face on photo with Photoshop be effective.
Instructions to cover the face on photos with Photoshop
In this article, Taimienphi uses Adobe Photoshop CC 2019 software to perform the trick. In other versions, the location of the tools or shortcuts may be different. To ensure a smooth learning process, your computer should have Photoshop CS6 or higher installed.
If you do not know where to find the Photoshop installer, you can refer to the list of links below.
=> Link to download Photoshop CC 2020![]()
=> Link to download Photoshop CS6![]()
=> Link to download Photoshop CC 2019![]()
Once installed, open the image to be edited with Photoshop and follow the instructions.
Method 1. Cover the face on the image in Photoshop with Mosaic
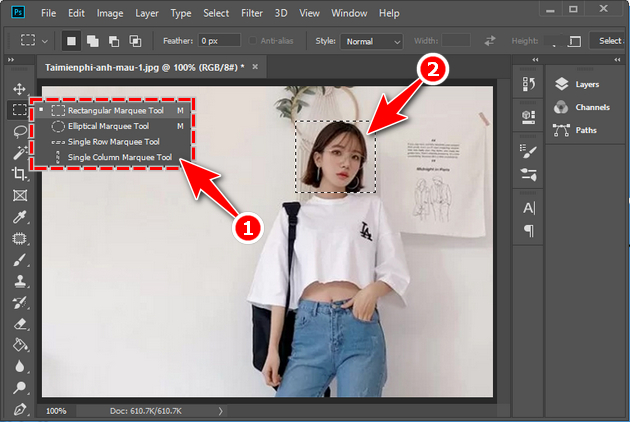
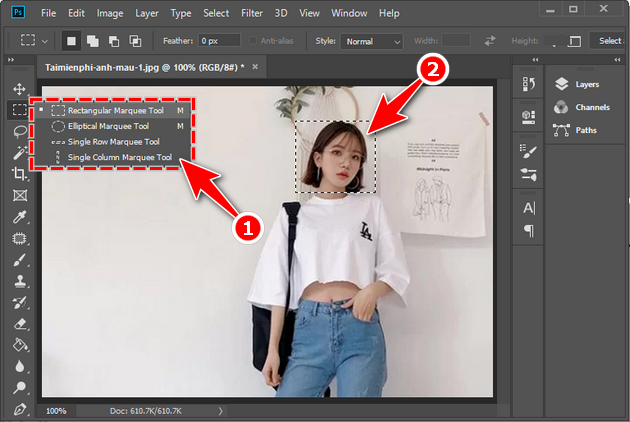
Step 1: First, you need to select the area to cover on the image. To do this, the simplest way is to use the zoning tool.
– Marquee Tool (shortcut M): Circle by cube;
– Lasso Tool (Shortcut L): Flexible zoning;
Select the tool, then you hold and drag to select the correct area you want to circle.
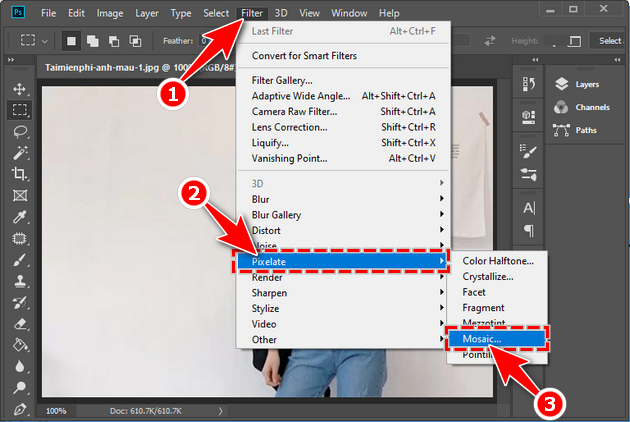
Step 2: Click on the item Filter on the menu bar, keep tapping Pixelate then select Mosaic feature.
Step 3: The Mosaic working window appears, where you can adjust the amount of image breakage and blur in the section Cell size or drag the slider at the bottom. The larger the Cell size index, the more blurred the selected object will be.
After editing to your liking, press OK .
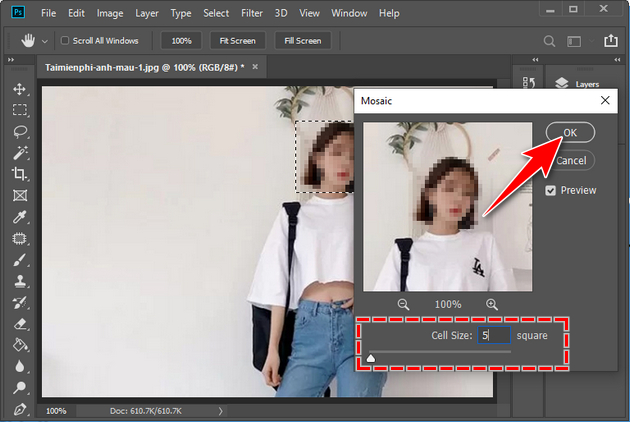
As a result, you will easily mask or blur the subject in the image as shown.

Method 2. Blur Objects in Photoshop Using Gaussian Blur
Step 1: Similar to method 1, you need to zone the area to be covered. You can use Marquee Tool, Lasso Tool or whatever tool you are familiar with.
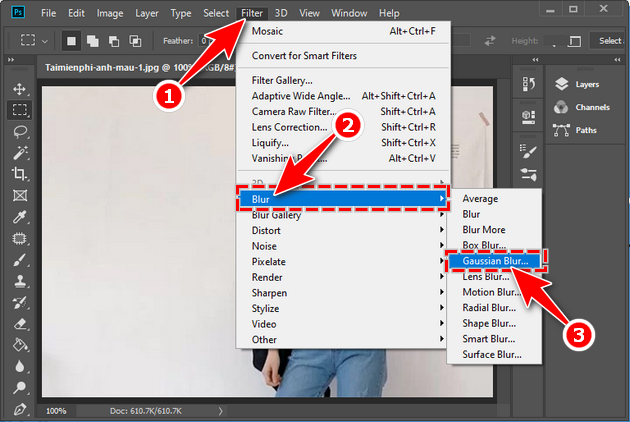
Step 2: Next, you also click on the item Filters, then Blur and choose Gaussian Blur .
Step 3: In the Gaussian Blur dialog box, drag the slider or adjust the parameters directly in the section Radius to create a masking blur effect. The larger the Radius, the more blurred the selection will be.
After editing, you press OK to save settings.
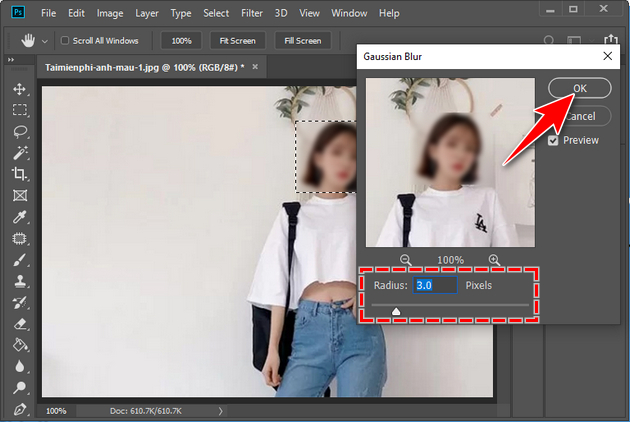
With Gaussian Blur, the masking effect on the image will be smoother than with Mosaic.

https://thuthuat.Emergenceingames.com/cach-che-mat-tren-anh-bang-photoshop-55251n.aspx
Depending on different needs and cases, you can flexibly choose the Gaussian Blur or Mosaic feature when you need to mask or blur objects on the image with Photoshop. In addition, there are many other ways and effects that can help you blur and delete selected objects effectively and aesthetically. And you, what tools do you often use to edit or mask in Photoshop? Leave a comment below this post! Instead of blurring the image, you can sharpen your image right in Photoshop, refer to how to sharpen an image in Photoshop here.
- See also: How to sharpen photos with Photoshop
Related keywords:
cover face on photo with Photoshop
masking in Photoshop, blurring objects in Photoshop,
Source link: How to cover a face on a photo with Photoshop
– Emergenceingames.com
