In the previous article, Emergenceingames.com showed you how to change the default background color in Illustrator, please refer to the following article by Emergenceingames.com to learn the Shape builder tool in Illustrator.

Get familiar with the Shape builder tool in Illustrator
The Shape Builder tool in Illustrator allows users to create complex objects by merging and deleting simple objects, selecting edges and areas of objects that can be merged or deleted to create new objects. Alternatively, users can also break overlapping objects to create new ones.
The object’s style properties are passed after being merged. By default, the Shape Builder tool is in Merge (merge) mode, but if you want you can switch to Erase (delete) mode by using the Alt key (on Windows) or Option (on Mac).
1. Create an object with the Shape Builder tool
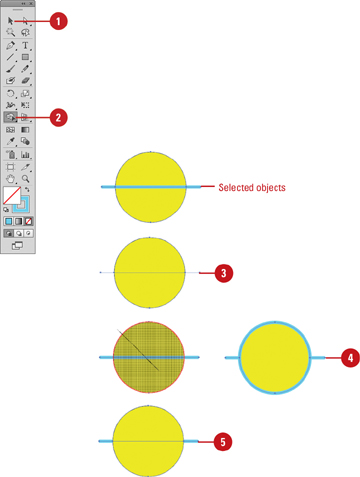
Step 1: Click select tool Selection in the Tools panel, then the paths that you want to merge to form a single object, shape.
Step 2: Click select tool Shape Builder in the tool panel. By default, Merge mode is selected.
Step 3: To break or extract an area from an object or shape, click on the selected area.
Step 4: To merge paths, drag the paths along the area.
2 merged areas will form a new shape. Attributes from the area are applied to merged or merged shapes.
Tip: Press and hold Shift key Simultaneously drag over the paths to show the most rectangular area and combine multiple paths quickly.
Step 5: To delete links, press Alt key (on Windows) or Options (on Mac) and click on the closed area or edge you want to delete.

2. Set Shape Builder Tool Options
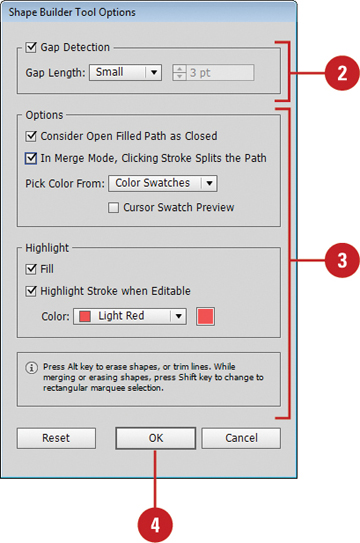
Step 1: Double-click the Shape Builder tool on the Tools panel.
Step 2: To detect and display the distance between objects, you check the box Gap Detectionthen select Gap Length or Small (3 points), Medium (6 points), or Large (12 points), or you can check the box Custom and optionally point size length.

Note: Make sure the distance length value is close to the actual distance length, otherwise Illustrator can’t detect it.
Step 3: Customize Options and Highlight settings:
– Consider Open Filled Path as Closed: Option to create invisible edge for open path to create area.
– In Merge Mode, Clicking Stroke Splits the Path: Select this option to split the parent path into 2, the first edge when you click specifies the split location.
– Pick Color From: Choose Color Swatches or Artwork as the source gradient for the objects. If you choose Color Swatches, be sure to check the box Cursor Swatch Preview for preview and color selection.
– Fill: Choose to highlight the merged area in gray or hover over the selected path.
– Highlight Stroke When Editable: Highlight the stroke with the color you selected.
Step 4: Click select OK.

The above article Emergenceingames.com just showed you how to use the Shape builder tool in Illustrator. In addition, if you have any questions or questions that need to be answered, readers can leave their comments in the comment section below the article.
https://thuthuat.Emergenceingames.com/cong-cu-shape-builder-tool-trong-illustrator-44645n.aspx
If you want to change the default background color on Illustrator to make it less boring, you can also use the different colors available to set the background color for the interface of the software. change the default background color in Illustrator ours.
Related keywords:
The Shape builder tool in Illustrator
use the Shape builder tool, get acquainted with the Shape builder tool,
Source link: The Shape builder tool in Illustrator
– Emergenceingames.com
