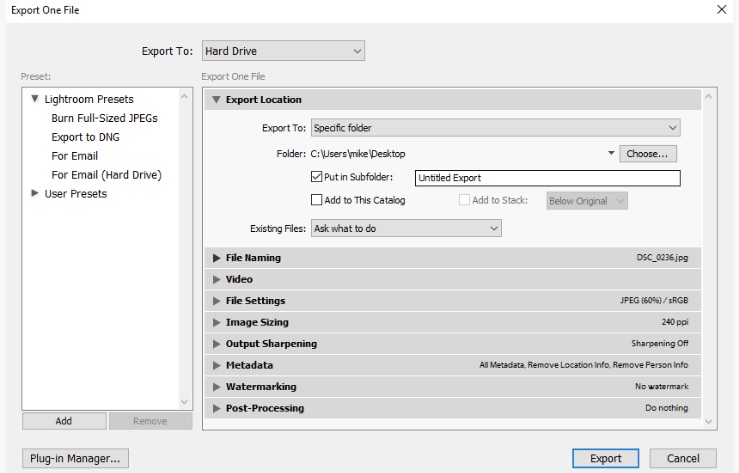
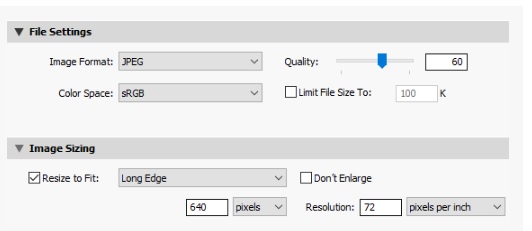
When exporting the image, we will have to create new files that adjust the Develop module and other changes we make to the XMP metadata of the image. When exporting we can choose the image file name, pixel size and resolution, and can save the export settings for future use.
In addition, we can use the Publish Services panel to export and upload JPEG images directly from Lightroom to share photos on the web.
Refer to the following article of Emergenceingames.com to learn how to export and save photos in Lightroom.
Export and save photos in Lightroom
To export and save photos in Lightroom, follow the steps below:
Step 1: Select the photo you want to export
First select a photo from grid view or Filmstrip.
Step 2: Open the Export dialog box
Choose File =>Exportor click Export button on the Library module. Then choose Export To =>Hard Drive from the menu in the top corner of the Export dialog box.

To export an image, save it to a USB drive, select Export To =>Hard Drivethen on the Export Location panel, select Export To =>Specific Folder. Click select Choose and navigate to the USB drive.
Step 3: Select export preset (optional)
Lightroom Classic CC has a number of presets built-in for exporting images to disk in specific file formats. For example, the For Email setting enables 72-dpi JPEG output and automatic emailing from Lightroom Classic CC.
If you want, you can select the preset in the left pane of the Export dialog box and skip to step 6.
Step 4: Set export options
Set the destination folder, naming convention, and other options in the Export dialog box.
For example, use the File Settings panel to select the image format you export, such as JPEG, PDF, TIFF, DNG, or native image format, and choose a background color.
In the Image Sizing panel, set the image size – size and resolution.

Step 5: Save image export settings (optional)
To save the export settings and use them in the future, click Add in the bottom corner of the Preset panel in the left pane of the dialog box Export.
Step 6: Export photos
Click select Export to export images.
The above article Emergenceingames.com has just shown you how to export and save photos in Lightroom. In addition, if you have any questions, or questions that need to be answered, readers can leave their comments in the comment section below the article, Emergenceingames.com will answer your questions as soon as possible. body.
https://thuthuat.Emergenceingames.com/xuat-luu-anh-trong-lightroom-44700n.aspx
When opening the interface of the software, many people still do not know how to import photos in Lightroom, that is, take photos from the computer hard drive or from the camera, specifically How to Import Photos in Lightroom You can see the instructions on our page.
Related keywords:
Export photos in Lightroom
save photos in Lightroom, how to export photos in Lightroom,
Source link: Export and save photos in Lightroom
– Emergenceingames.com


