Whether you are disable Wi-Fi for a specific period of time, monitor data usage or block specific networks from appearing, … 7 features that Emergenceingames.com mentioned below will definitely be useful to you.
If you know any more useful Wi-Fi tips on Windows 10share your opinion in the comment section below the article.
7 Wi-Fi features on Windows 10 that you didn’t know
1. Turn Wi-Fi back on after a period of time
Let’s say you don’t want to be connected to Wi-Fi 24/24 to prolong the battery life of your device or do not want to be disturbed. Whatever it is, you don’t need to remember to turn Wi-Fi back on, with that you can let Windows automatically turn on WiFi after a specific amount of time.
To do this, press the key combination Windows + I to open Settings. On the Settings window, find and click Network & Internet =>WIFI. Slide the Wi-Fi connection bar to Off.
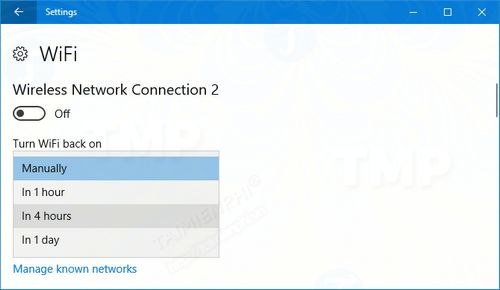
The menu will be displayed again on the screen Turn WiFi back on. By default the option is set to Manually, but you can choose Print 1 hour, Print 4 hours, and Print 1 day.
In addition, if you turn off Wi-Fi via the icon on the Taskbar, you will see the same options.
2. Test network speed
A network adapter is a piece of hardware that a system uses to communicate between a network. 1 of 7 Wi-Fi features on Windows 10 that you don’t know is a network speed test that will help you see the maximum receiving speed and transmission speed of your network card, follow the steps below.
First, press the key combination Windows + X to open the WinX Menu, then click Command Prompt. Copy and paste the command below into the Command Prompt window:
netsh wlan show interfaces
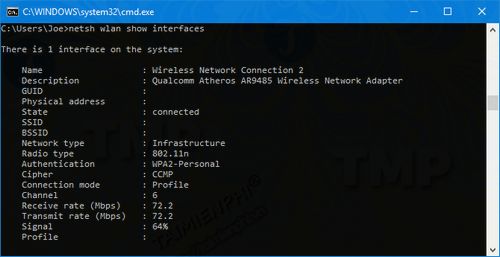
The above command will list all the network cards on your system and their respective details. Check line Receive rate (Mbps) and Transmit rate (Mbps) to see the limit of the network card. Note that this is what the hardware can handle, not what you are paying your Internet service provider for.
To see how the network actually works, you can download Microsoft’s Network Speed Test application to your computer, install and test.
Download Network Speed Test to your computer and install it here: Download Netword Speed Test
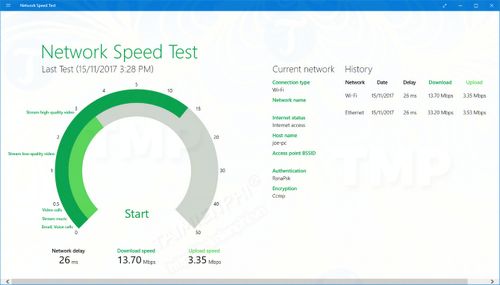
All you need to do is launch the application, click Start and wait about half a minute for the application to check. You will then see the upload and download speeds of the network displayed on the screen. If you find the speed is not suitable, you can report it to your network operator to fix it or follow the 10 tips to speed up your home Wifi that Emergenceingames.com has instructed.
3. Create a portable Wi-Fi hotspot
If you use an Ethernet wired network connection on your computer, you can use it to create a WiFi hotspot on Windows 10, hotspot on Windows 10 allows you to share your connection with other devices so that can connect to the network via Wi-Fi.
To start, press the key combination Windows + I to open Settings. On the Settings window, find Network & Internet => Mobile hotspot.
Here, in the menu Share my internet connection fromselect your Ethernet connection.
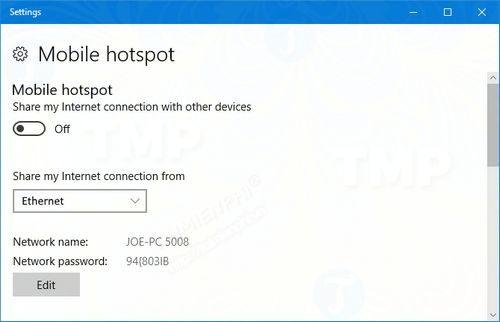
Windows will automatically provide you with a network name (Network name_ and network password) These are details that other devices need to be able to connect to your network. Edit if you want to change these details.
If you don’t want other devices to turn on your portable Wi-Fi hotspot without it being activated, just drag the slider Turn on remotely to OFF.
Once ready, drag the slider Mobile hotspot luxurious ON. Up to 8 devices can connect to your portable Wi-Fi hotspot at the same time.
Not only with Win 10, but you can play wifi on Windows 11 easily, helping other devices to catch wifi quickly. How to broadcast wifi on Windows 11 will be shared in this article, for your reference.
- See also: How to play Wifi on Windows 11
4. Use keyboard shortcuts to enable/disable Wi-Fi
If you want to quickly turn on and off Wi-Fi, the fastest way is to use keyboard shortcuts. On the keyboard you can see a series of function keys. However, just using these keys is not enough.
Right click on the desktop, select new =>Shortcut. Enter the line below:
netsh interface set interface name=”CHANGEME” admin=disabled
You will have to switch CHANGEME for the name of the Wi-Fi. If you don’t know what the Wi-Fi name is, right-click the Wi-Fi icon on the Taskbar to display a list of all available connections.
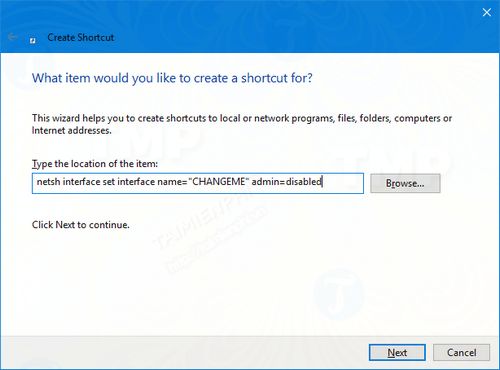
Click select next. This shortcut to turn off Wi-Fi, after giving a suitable name, click finish.
Follow the same steps as above to create a shortcut to turn on Wi-Fi, but enter the command below instead:
netsh interface set interface name=”CHANGEME” admin=enabled
Remember to pass CHANGEME for the name of the Wi-Fi.
Once done, these shortcuts require running as Admin. Right-click each shortcut, click Properties =>Advanced… =>Run as administrator =>OK.
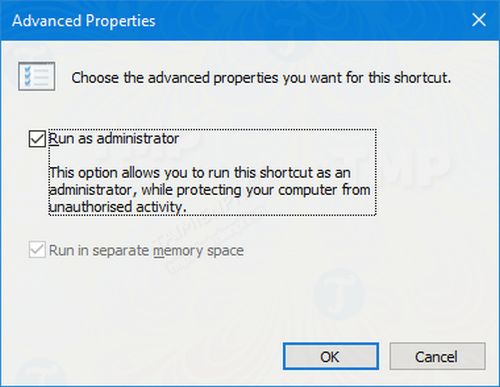
On the Properties window, click Shortcut key. Press any key combination you want to use to activate the above shortcut. Once done, click OK.
5. Using a Metered Connection
You can set up your Wi-Fi connection as “metered”. This allows you to control and limit network data access.
For example, controls that don’t automatically download updates, refresh Start menu tiles, or sync OneDrive data.
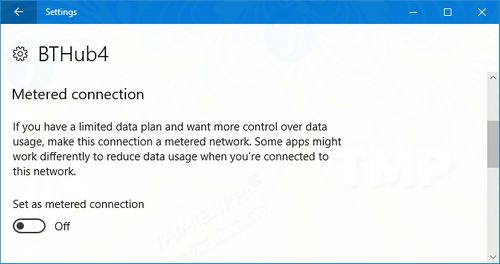
To enable this feature, press the key combination Windows + I to open the Settings window. Here find and select Network & Internet =>WIFI =>Manage known networks.
Here select your Wi-Fi connection from the list and then click Properties. Finally drag the slider Set as metered connection luxurious ON.
6. Block Certain Wi-Fis
You can prevent a specific Wi-Fi network from showing up on your computer by using that Wi-Fi network name. This is useful in case if you want users to be able to connect to or view only networks that you have approved.
First press the key combination Windows + X to open the WinX menu, then click Command Prompt (Admin).
To allow specific networks to be visible, copy and paste the command below into the Command Prompt window:
netsh wlan add filter permission=allow ssid=”CHANGEME” networktype=infrastructure
Turn off CHANGEME for the Wi-Fi name you want to allow. Run the command below multiple times if you want to allow different networks.

When ready, run the command below to block all different networks from appearing:
netsh wlan add filter permission=denyall networktype=infrastructure
Alternatively if you only want to block specific networks, copy and paste the command below:
netsh wlan add filter permission=block ssid=”CHANGEME” networktype=infrastructure
Replace CHANGEME with the name of the Wi-Fi network you want to block.

In case if you want to go back to the original setting, run the above commands again but replace add equal delete.
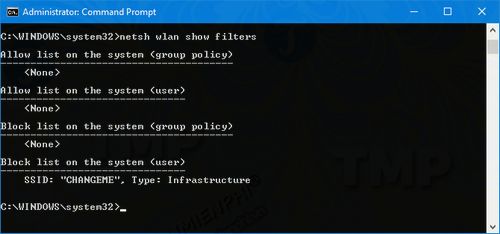
To see the list of active filters, run the command below:
netsh wlan show filters
7. Data Usage Tracking
If you want to know how much data each application on the system is using. Windows 10 will show data usage for the last 30 days.
Press the key combination Windows + I to open Settings. Access Network & Internet =>Data usage =>View usage details. At the menu Show usage fromselect WIFI.
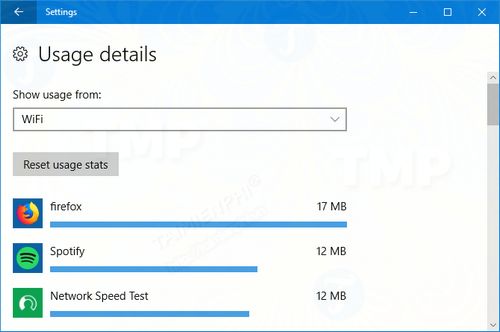
If you want to reset the calculation in 30 days, click Reset usage stats.
To view real-time network usage, press the key combination CTRL + Shift + Esc to open Task Manager. On the Task Manager window, at Processes tab find column Network to see the data used in Megabytes/second of each application and process running in the background.
Above Emergenceingames.com just introduced to you 7 Wi-Fi features on Windows 10 that you don’t know. Since this is an operating system that is under continuous development, it is likely that Microsoft will add more features in the future.
https://thuthuat.Emergenceingames.com/7-tinh-nang-wi-fi-tren-windows-10-ma-ban-chua-biet-29509n.aspx
Was the above article helpful to you? If you find it interesting, don’t forget to share it with your friends and family.
Related keywords:
Wi-Fi feature on Windows 10
Wi-Fi tips on Windows 10, tips for using Wi-Fi on Windows 10,
Source link: 7 Wi-Fi features on Windows 10 that you didn’t know
– Emergenceingames.com
