Enabling HTTPS ensures that communications to and from the server are automatically encrypted. This is to prevent attackers from stealing sensitive information of guests when accessing the Internet.

Visitors will feel more secure if they see a blue lock icon when accessing your website, and they can understand that the site has been certified for security. Steps to create HTTPS for website Simple will make your website more secure, increase the number of visitors.
Simple steps to create HTTPS for your website
overview
The biggest advantage of an SSL certificate is its ease of installation. After completing the SSL installation, your next task is to direct users to use HTTPS instead of HTTP. If trying to access the website by putting https:// before the URL, you will get an error message immediately. The reason is because you have not installed the SSL certificate. The following article Emergenceingames.com will guide you through the simple steps of creating HTTPS for your website as well as how to install and activate an SSL certificate.
The steps to create HTTPS for Website are very simple, including 5 steps:
1. Set up a private IP address for the server.
2. Buy a certificate.
3. Activate the certificate.
4. Install the certificate.
5. Configure the site to use HTTPS.
Step 1: Set up a private IP address for the server
To provide the best security, a certificate requires your website to have its own IP address. Many small web host packages are added with a shared IP address, which many other sites use in the same location. With a dedicated IP address, you can ensure that traffic from your IP address is only going to your website and not another website.
If you are looking for an affordable web host with a dedicated IP address, you can choose StableHost. At the moment the StableHost package costs less than 6 USD/month, but the price will be cheaper if you pay for the 1-year plan as well.
If you don’t already have a dedicated IP address plan, you can ask your existing host to upgrade your account for a dedicated IP address. Of course you will have to pay a fee, be it for the whole year or monthly.
Step 2: Buy a certificate
Next step you will need something to prove the website owner is you, like your website certificate. To do this, you will have to create an SSL certificate.
A certificate is simply a piece of letters and numbers that only your website knows, which can be roughly interpreted as a long password. When a visitor visits your site via HTTPS, the password is checked and if it matches, it automatically verifies the site owner is you, and it encrypts everything, including traffic. access on your website.
It’s technically something you can create yourself (also known as a self-signed cert), but all popular web browsers are certified by a certificate authority (CA). ) check, and also long password copy and you can confirm. To be recognized by digital certificate providers, you must purchase a certificate for your website. You can learn more Top 10 SSL certificate providers It is best to choose a good, suitable certificate provider for your website.
GeoTrust QuickSSL is one of the best certificate providers, along with NameCheap, and several other certificate providers. At this point, GeoTrust QuickSSL certificates cost $46/year, and come with a site stamp that you can place on your site to let users know it’s a trusted site.
Step 3: Activate the certificate
Note: Check if your web host has automatically activated the certificate. Activating certificates can get complicated, if possible it’s best to wait 1 to 2 days for them to do so.
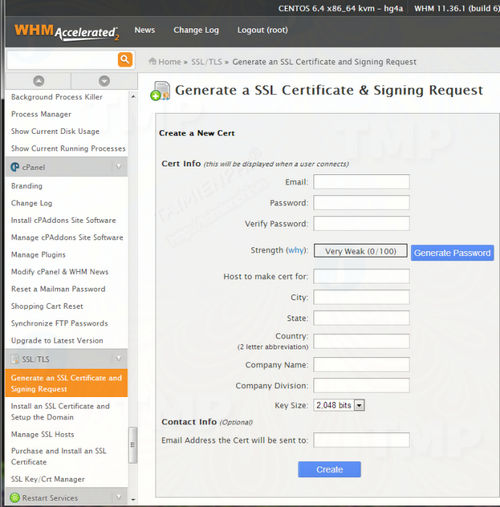
If you manually activated the certificate, the next step you need to do is to create a CSR file. The easiest way to create a CSR file is to do it in the web hosting control panel, such as WHM or cPanel. Go to SSL/TLS admin and select Generate an SSL certificate and Signing Request. Fill in the information in the boxes as shown below:

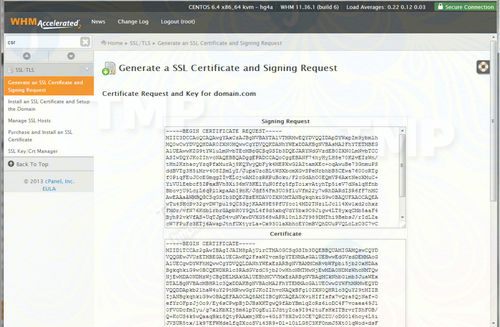
In the frame “Host to make cert for” enter your domain name, and the Contact email box may be blank. After filling in all the information, you will see a window like the one below displayed on the screen:

Copy the first block of text. You need to use this CSR to provide your issuer with an SSL certificate so they can establish your identity. Log into your NameCheap account or whatever account you purchased the certificate for and activate it.
Paste your CSR in the required frames. It will ask you for an approval email. This is the email address that proves you own the domain name, such as [email protected]
Step 4: Install the certificate
Note: Check if your web host has a certificate installed. Installing certificates can get complicated, if possible it’s best to wait 1 to 2 days for them to do so.
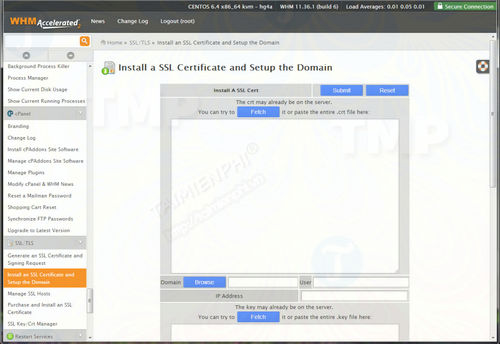
If you install the certificate yourself, the steps are very simple. Once you have the certificate in hand, all you need to do is paste it into your web host control panel. If you are using WHM.Cpanel, from SSL/TLS menu you click select Install an SSL Certificate.

Paste it in the first box and then click Submit. Now you can try accessing your website through https://www.domain.com.
Step 5: Configure the site to use HTTPS
If your site access has https:// placed before the page URL, the page will be loaded. That is, you have successfully installed SSL and enabled HTTPS protocol, but the problem is that your visitors are not protected. Your job is to make sure your website visitors are over HTTPS.
One thing to note is that HTTPS should only be set up for e-commerce websites or sales websites, … .If you enable HTTPS on websites where users don’t log in sensitive information, it will be a waste of time. encryption processing overhead and slow down the experience. Identify the target site and follow one of the two methods below.
You can update all links to target sites using HTTPS links. In other words, if there are links to the shopping cart on the homepage, update those links to use the secure link. This to link all pages pointing to sensitive URLs.
However, if you want to ensure that users can only use specific secure pages no matter what link they have, it is best to use a server-side approach to redirect non-HTTPS users. .
To do this, you insert a code snippet at the top of the secure page. Here is one of the code snippets in PHP:
// Require https
if ($_SERVER[‘HTTPS’] != “on”) {
$url = “https://”. $_SERVER[‘SERVER_NAME’] . $_SERVER[‘REQUEST_URI’];
header(“Location: $url”);
exit;
}

Another server-side approach is to use mod-rewrite. This does not require you to change any site files, but will have to edit the apache configuration. Here is a mod-rewrite:
RewriteEngine On
RewriteCond %{HTTPS} off
RewriteRule ^(cart/|checkout/) https://%{HTTP_HOST}%{REQUEST_URI}

This will ensure that if someone accesses the site via HTTP, they are automatically redirected to HTTPS.
Tips
You need to understand that HTTPS does not mean that the information on the server is secure, it only protects the transfer of data from the visitor’s computer to your server. Once sensitive data is transferred to your server, it is kept safe by encrypting the database,…
Some users only need to search for keywords on the page and not in the browser. After installing SSL, you can add a lock icon on your web pages to let them know it’s a trusted site, in case if they don’t notice the URL bar.
https://thuthuat.Emergenceingames.com/cac-buoc-tao-https-cho-website-don-gian-32232n.aspx
Above, Emergenceingames.com has just guided you through the simple steps to create HTTPS for your website. A secure and trusted website is one that has properly installed security certificates. By installing SSL certificates on your website, you can rest assured your website visitors are less vulnerable to attacks. If you cannot distinguish between HTTPS and SSL, please refer to the article distinguish HTTP, HTTPS and SSL here.
Related keywords:
Create HTTPS for simple website
how to create HTTPS for a simple website, steps to create HTTPS for a simple website,
Source link: Simple steps to create HTTPS for your website
– Emergenceingames.com
