You want to configure your modem or router with the NAT Port, Forward port method but don’t know how to do it. Refer to the article below to learn how to NAT Port, Forward port with today’s popular modems.
Related Posts
- How to NAT Port Modem Viettel, open Viettel modem port
- How to block ports (ports) on popular modem lines, TP-Link, Netgear, D-Link
- (Giveaway) Copyright free software iMyFone D-Port, extract iPhone, iPad data
- Block Wanna Cry on Windows XP, close port (port) 445, 135, 137, 139
- How to close port 445 on Windows XP/7/2000/2003 to prevent Wanna Cry
NAT Port, Port Forwarding is the process of forwarding a specific port from one network to another. This forwarding technique allows external users to access the internal network using that port from the outside through the router. This system is widely used in offices, schools and families with many computers or Internet-connected devices, and typically the Camera application. The following article, Taimienphi will guide you to read how to NAT PortForward port with today’s popular modems, let’s follow up and give feedback on the article and discuss right under the article the problems.

How to NAT Port, Forward port with popular modems.
1. How to NAT Port, Forward port with ZTE F600w Viettel modem.
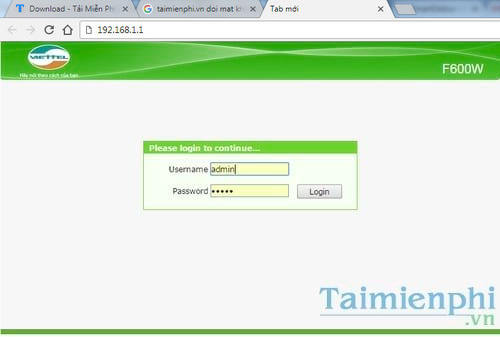
Step 1: To NAT Port Modem Viettel, we first access the Viettel modem by entering the address 192.168.1.1 on any web browser. Then you proceed to log in with the default admin rights: username: admin, password: admin to conduct NAT Port Modem Viettel
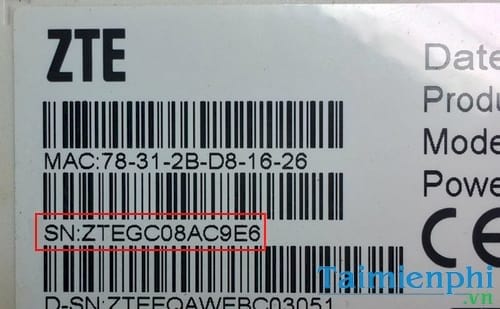
Or you can also enter the account information as admin and the password is the Serial Number printed on the back of the ZTE F600W Modem
Step 2: Next, go to: Application >Port Forwarding then enter the parameters as shown below, notice that the IP of the recorder must be a static IP in the LAN. For example: 192.168.1.248 below.
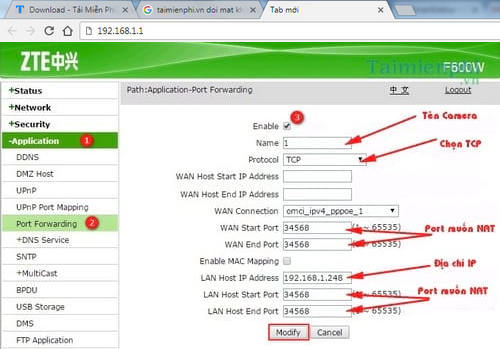
After adding the ports that need NAT, we will have the results displayed as shown below, here we can edit or delete them.

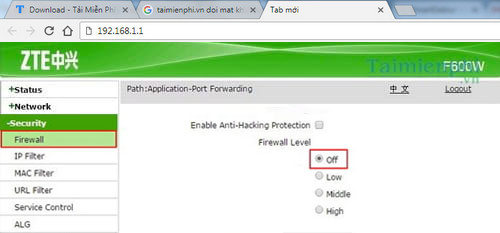
Step 3: Proceed to turn off the firewall, you choose Security > Firewall then choose Firewall Level and click option Off.
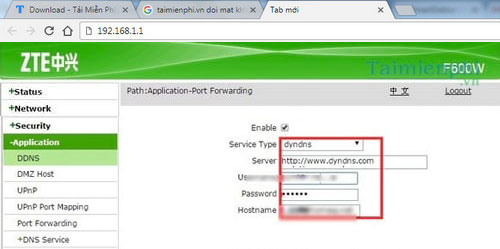
Step 4: Then proceed to configure DDNS for the domain name to automatically update the dynamic WAN IP (if there is a WAN IP that is a static IP, skip this step).
Go to Application > DDNS select enable mode Enable then choose a service provider that the modem supports, for example: NoIP, Dyndns,… here I use Dyndns for stability. Then press Submit to save.
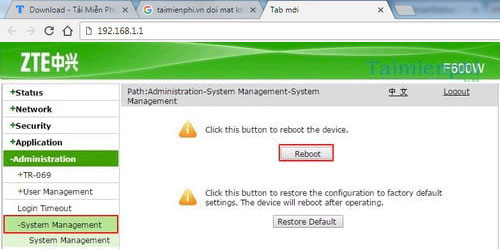
Step 5: Restart the modem to update the domain name to the new dynamic WAN IP and complete the installation process. To do this, you go to Administration >System Management select Reboot Wait about 2-3 minutes for the modem to finish booting.
2. How to NAT Port, Forward port with GPON FPT modem.
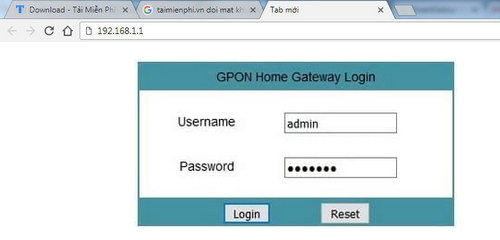
Step 1: Use any web browser to access the address 192.168.1.1 and fill in the login information User/password to be admin.
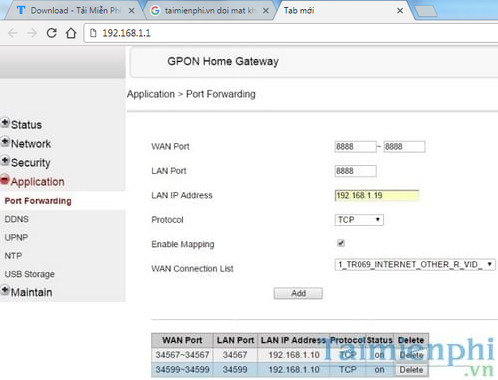
Step 2: After successfully logging in, we proceed to NAT Port for the camera as follows:
Into the Application > Port Forwarding then enter the parameters: port, ip camera or video recorder, turn on NAT mode then click Add to add to NAT mode. Continue the same with the remaining cameras and ports.
Step 3: Next, move on to Security > Firewall uncheck 2 lines Remote Telnet Enabled and Remote Https Enabled This operation helps us to watch smoother without being blocked by the modem. Usually, when there is a danger that affects the data on the computer, the user will proceed to block the Port on the modem line he is using, how to block the Port properly, you can Follow the post how to block port that we have instructed.
Step 4: After the NAT is done, install DNS on the modem to update the carrier’s dynamic IP, if the WAN IP is a static IP, you can skip this step.
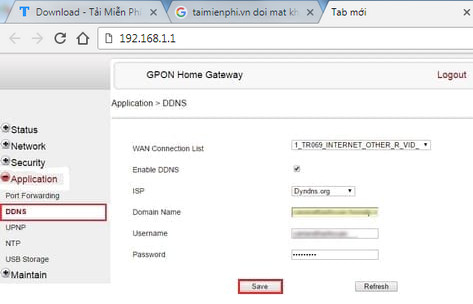
Proceed to enter the domain name information for the camera, go to Application / DDNS, select the line to connect, turn on the mode, select the DDNS service provider, enter the domain name and that domain account, then click Save to save domain configuration.
Step 5: Finally, to complete the process of NAT Port camera for GPon FPTelecom modem, restart the modem by going to Maintain >Reboot Devicepress select Reboot Wait about 2-3 minutes for the modem to finish booting.
3. How to NAT Port, Forward port with Huawei VNPT modem.
Step 1: First you need to determine what the port needs NAT and what is the IP address of your home camera. (For Port and IP you can and item Settings (Settings) of the recorder >Network (Network) and the address will appear here).
Step 2: After determining the IP Camera address, from your computer, access the default Gateway address of the modem 192.168.1.1 It will display the following interface:
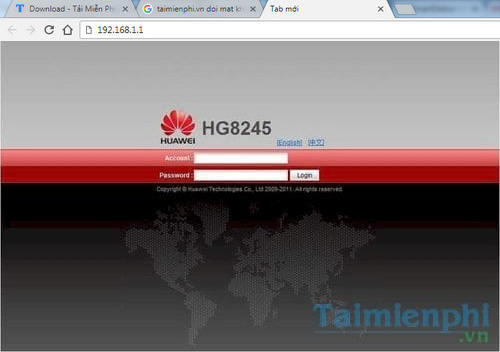
Log in with the following account information:
Account: telecomadmin
Password: admintelecom
or
Account: root
Password: admin
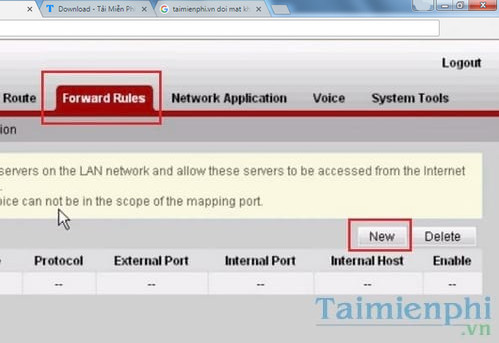
Step 3: Log in successfully, at the modem management interface, select the tab Forward Rules > new to add DMZ.
Step 4: Here, please check the box Enable DMZ To activate DMZ, enter the IP address of your home camera (For example, my home address is 192.168.100.4) and then press Apply to save.
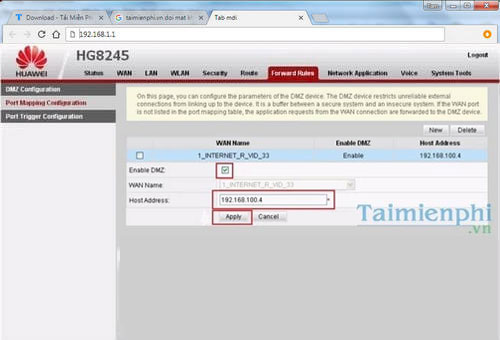
Step 5: Continue clicking the item Port Mapping Configuration to continue the installation.
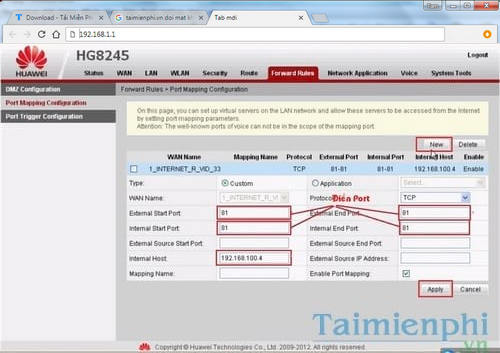
Here you press new To start Nat Port, fill in the Port completely in 4 boxes and must be the same, next enter the IP address (192.168.100.4), check the box. Enble Port Mapping and press Apply to save the configuration.
Step 6: Press new to continue Nat 1 more Port.
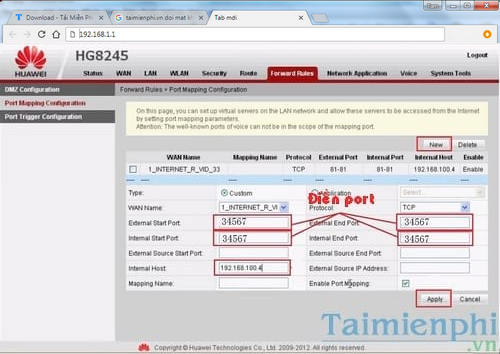
The second port we need NAT (mine is 34567. Each type of first has a different port, please pay attention not to NAT by mistake). Next, enter the IP address of the recorder, check the box Enble Port Mapping then press Apply to save the configuration.
Step 7: Next, you start adding the domain name to the DDNS section by switching to the tab Network Applications and select item DDNS Configuration.
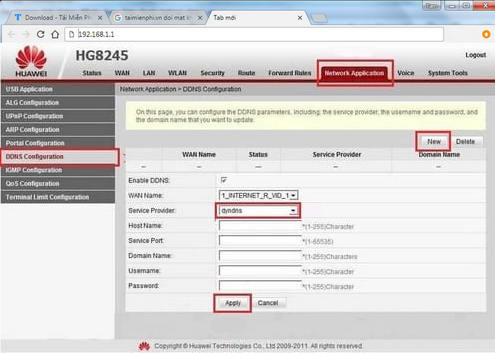
Here you click new to display the options below. Next to Service Provider select dyndns
– UMBRELLA HostName If it is available, we do not have to change anything, if it is not available, we fill it out member.dyndns.org.
– UMBRELLA Svicer Port if it’s available then we don’t have to fill it out. If there is no we fill in 80
– Domain Name we type in the domain we created
– Username is our dyndns.org account name
– Pass of our dyndns.org account
– Click Apply to save the configuration and finish.
https://thuthuat.Emergenceingames.com/cach-nat-port-forward-port-voi-cac-modem-pho-bien-23794n.aspx
So with the article that Taimienphi summarizes and shares above, hopefully readers can know how to NAT Port, Forward port with today’s popular modems that network operators provide. With some other modems, the interface may be different, but the structure of the NAT port will not change. If you have difficulty accessing your modem or router, you can refer to the article on how to log in to the modem with the current common lines that we have shared earlier. Any mistakes in the implementation process, readers can leave feedback right below and we will discuss together. Good luck.
Related keywords:
NAT Port
Forward port, Forward port with popular modems,
Source link: How to NAT Port, Forward port with popular modems
– Emergenceingames.com
