With the previous version of Photoshop CS6, Taimienphi has made a tutorial on how to fix red-eye error on photos. So with the new version, then How to fix red eye on photos with Photoshop CC 2020 How is it effective? We invite you to follow the content below.

How to fix red eye on photos with Photoshop
How to fix red eye on photos with Photoshop CC 2020
To ensure that you follow the instructions on how to remove red eyes in Photoshop most accurately, install the latest version of Photoshop. If not, download Photoshop CC 2020 right in the following link.
– Download Photoshop CC 2020 here: Download Photoshop CC 2020
Method 1: Fix red-eye on photos with Photoshop automatically
In the latest version of Photoshop CC 2020, Adobe has integrated the Red Eye Tools tool specializing in fixing red-eye errors on photos quickly and conveniently. To activate this tool, you press the shortcut J then tap the eye icon in the menu.
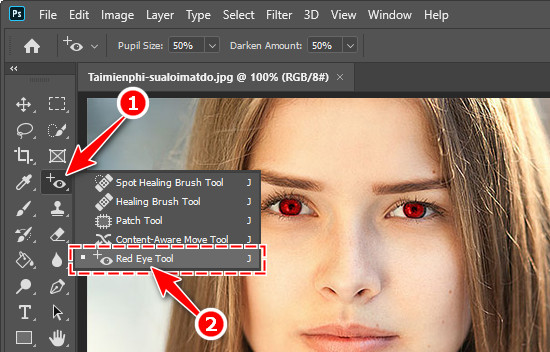
Next, you just need to use this tool to click on the red-eye area on the image, the system will automatically calculate and re-align. The result will look like the image below.

With this automatic way to fix red-eye errors on photos with Photoshop, users do not need to set up or tweak much to successfully remove red-eye errors. However, the picture is still not really beautiful, to have a satisfactory work, Taimienphi recommends users to perform manual tweaking.
Method 2: Remove red eye in advanced Photoshop
With this way of fixing red-eye on photos in Photoshop, the process will be longer, but the effect is also more beautiful and more user-friendly. Users follow the instructions as follows.
Step 1: Open the image to be edited in Photoshop software. Press W then select tools Quick Selection Tool .
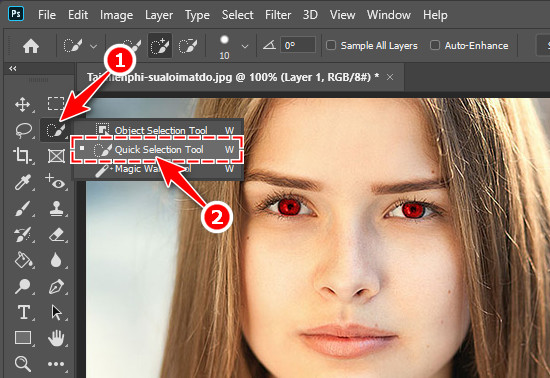
Step 2: Use this tool to circle, select the red eye in the image. User presses key [ và ] to increase or decrease the tool size.

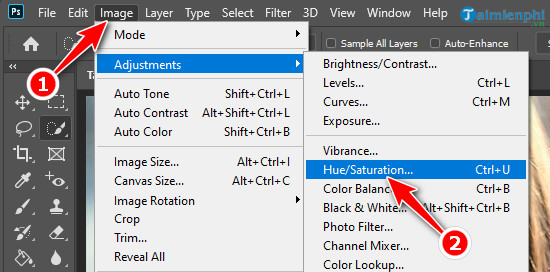
Step 3: Next, you click on the item Image located in the menu bar at the top of the screen. In the drop-down menu, you choose Adjustments and choose Hue/Saturation (Shortcut Ctrl + U)
Step 4: In the work table Hue/Saturation you adjust the parameters Hue , Saturation and Lightness by dragging the sliders up or down to remove the red-eye effect on the image. Once done, press OK .
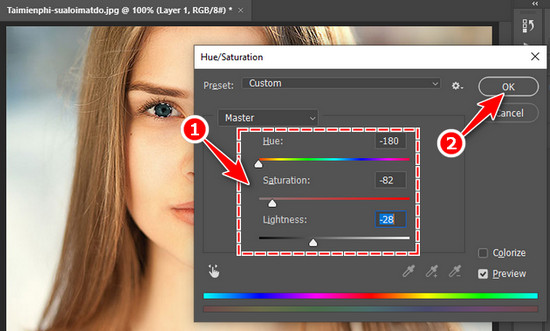
Immediately, the effect will be applied to the image. The result will look like the image below.
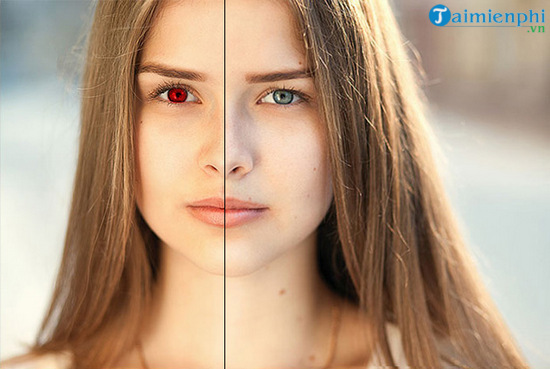
Through the content of the article, Taimienphi has introduced to users 2 ways to fix red eye errors on photos with Photoshop CC 2020. If you do not have much time and accept temporary results, the tool Red Eye Tool will be the right choice for you. On the contrary, if you want a more beautiful, quality photo, then spend more time editing with the tool Hue/Saturation .
https://thuthuat.Emergenceingames.com/cach-sua-loi-mat-do-tren-anh-bang-photoshop-cc-2020-56289n.aspx
Besides removing red eye in Photoshop, users can also refer to more tips to know more How to convert color photos to black and white in Photoshop with the Hue/Saturation tool.
Related keywords:
Fix red eye on photos with Photoshop
remove stains in Photoshop, remove red eyes in Photoshop,
Source link: How to fix red eye on photos with Photoshop CC 2020
– Emergenceingames.com


