Domain Name System (DNS or domain name resolution system) is where all the domain names of the websites you have visited are stored. When searching for a domain name in a web browser, it is forwarded to a DNS server by your router. If the domain name of a particular website has been saved, then it returns the corresponding IP address. This makes the loading of those web pages exceptionally faster.
However, sometimes the server cannot establish a connection. Attempting to troubleshoot your web browser in this case may result in DNS server not responding error. There are many reasons why that message appears on your computer screen. The most prominent among them is that there is a possibility that the server is currently experiencing an outage, and users can fix this problem with some solutions as follows:

Instructions to fix DNS Server Unavailable error
This error can sometimes be resolved with a few very simple methods, such as switching to a different web browser, tweaking the firewall settings, or restarting the router.
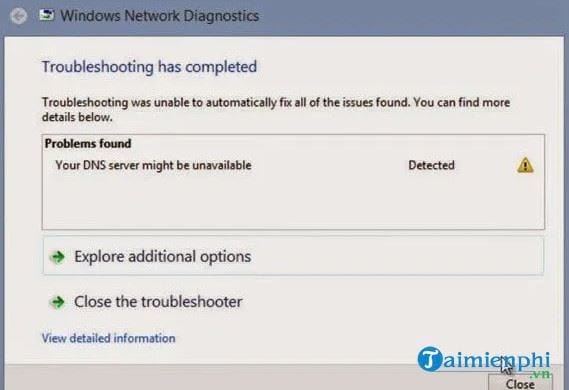
Start by using a different web browser to open the web pages you’re trying to access. This means that if you are currently receiving this error message while using Mozilla Firefox, then switch to Microsoft Edge or Google Chrome. If the problem persists, we can move on to checking other devices.
Open a website that uses mobile phones on the same network to make sure the problem is not the result of a hardware failure, and don’t forget to try accessing the site with your data plan to determine if the cause is in fact the DNS server. Finally, restart your router. In case the DNS server unavailable error is still not fixed after trying some of the basic things above, it’s time to apply more “advanced” methods.
1. Clear your DNS:
The most effective method to fix the problem of DNS server not being available is to delete it using Command Prompt.
1.1. On Windows
– Press the key combination Windows + CHEAP to open the dialog box Run.
– Import cmd and press Enter.
– In the window Command Promptyou enter ipconfig /flushdns and press Enter.
– Continue by typing typing ipconfig /release and press Enter.
– Finally, enter ipconfig /renew and press Enter.
– Close the window Command Prompt and restart the system.
1.2. On MacOS
Depending on the version of MacOS you are using, the process of clearing DNS is slightly different. It usually just involves a change in the syntax used during the process.
Step 1: Open the window Finder and go to Applications > Utilities > Terminal.
Step 2: Enter the following syntax relative to the version of MacOS you are using:
– MacOS High Sierra – sudo killall -HUP mDNSResponder; sleep 2; echo macOS DNS Cache Reset | drunk
– MacOS Sierra – sudo killall -HUP mDNSResponder;say DNS cache has been flushed
– MacOS Mojave – sudo killall -HUP mDNSResponder;sleep 2;
– MacOS X El Capitan/Yosemite – sudo dscacheutil -flushcache;sudo killall -HUP mDNSResponder;say cache flushed
Step 3: Press the back key, enter the password and press the back key again.
– Wait for the audible warning to sound indicating successful DNS clearing before leaving Terminal.
You will need to take a few more steps to clear the cache on MacOS X including clearing both the MDNS and UDNS cache above the steps that were done earlier. Before closing the Terminal window, enter the following commands:
– With MDNS cache, enter sudo discoveryutil mdnsflushcache
– With UDNS cache, enter sudo discoveryutil udnsflushcaches
2. Uninstall anti-virus software:
Installing too much antivirus software simultaneously on a computer can create an obstacle to the protection provided. Check to see if you are installing more than 2 anti-virus programs as this can be the cause of DNS errors. After disabling all unnecessary protection tools, you restart your computer and maybe the DNS problem has been resolved.
You should only use a single antivirus program to help protect you against malware attacks. Not only does this increase protection, but it can also help you avoid future DNS server failures.
3. Change DNS Server
If you’ve tried the above methods but haven’t worked, you should probably change the DNS server. There are many public DNS to choose from, Google’s free DNS is one of the most trusted. Process change DNS server very easily, with just a few simple mouse clicks.
3.1. Change DNS via router
Step 1: Access your router by opening a web browser and entering the address Default Gateway in the URL bar.
You can find this address by opening the window Command Promptimport ipconfig and press Enter. Copy the sequence of numbers next to item Default Gateway.

Step 2: Log in to the router with the appropriate credentials.
Step 3: Locate your Internet account information which can usually be found in a tab with the corresponding name.
Step 4: Go to the DNS server and select the option that reflects the Internet protocol used (IPv4 or IPv6).
Step 5: Enter the address of the DNS server you want to use to replace the current DNS server.
Google’s DNS server will be 8.8.8.8 under DNSv4 and 8.8.4.4 in the alternate DNS server. In the case of IPv6, you would enter times turns 2001:4860:4860::8888 and 2001:4860:4860::8844.
Step 6: Save the edited information and exit the router interface.
3.2. Change DNS to Windows OS
Step 1: Access your network connection properties by opening the dialog Run (Windows + CHEAP) and enter ncpa.cpl. Then press Enter.
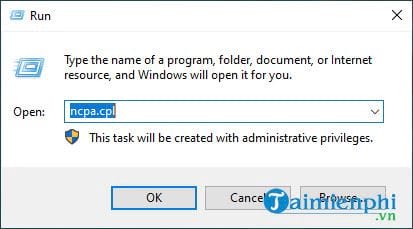
Windows 10 users can right-click the Windows icon and select Network Connections from the menu.
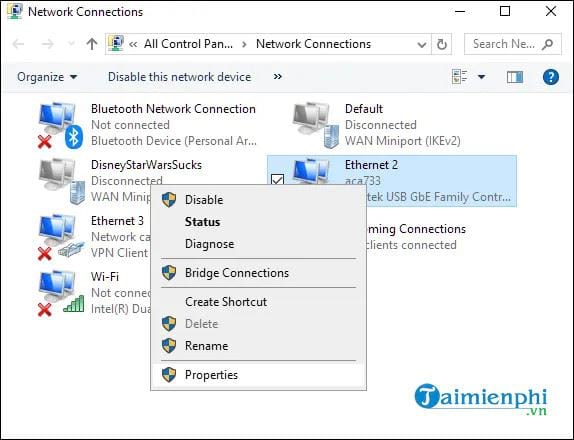
Step 2: Select the network adapter currently in use. The WLAN connections for Wifi and the LAN for the direct connection are usually via an Ethernet cable.
You will have options in the left panel on Windows 10. Select and click Change adapter options from the main window.
Step 3: Right click on your selection and click Properties.
Step 4: In the tab Networkingyou highlight your IP version (v4 or v6) from the menu and click on the . button Properties.
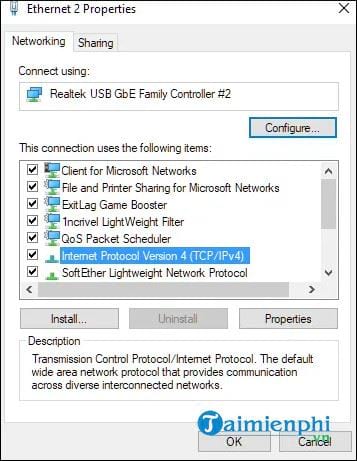
Step 5: Select Use the following DNS server addresses.
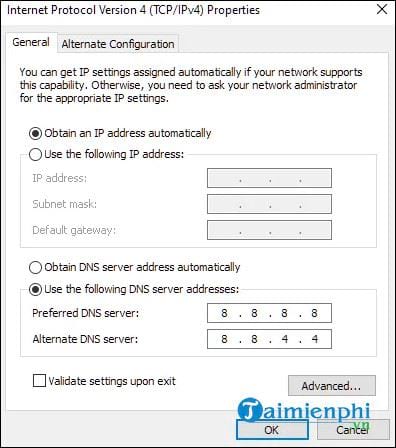
Step 6: Enter the DNS server address you plan to use. If you used a DNS server that wasn’t automatically acquired before, be sure to save the addresses for in case you want to return to them someday.
Step 7: Click OK to apply the change.
3.3. Check out the new DNS server
After the DNS servers have been changed, open a web browser and try to visit a website. If the site is immediately visible, the new DNS is working properly. If not, enter one of Google’s IP addresses like 172.217.16.195 directly into your browser and press Enter.
https://thuthuat.taimienphi.vn/cach-sua-loi-dns-server-unavailable-54479n.aspx
Wait until the familiar Google logo and search bar appear. If this also fails, then the problem may be with the Internet and not the DNS server. In that case, contact your Internet service provider for assistance.
Related keywords:
Fix DNS Server Unavailable
error dns server isn’t responding, how to fix DNS Server Unavailable error,
Source link: How to fix DNS Server Unavailable error
– Emergenceingames.com
